To Join or Not?
Once the avatar is in place some tutorials recommend joining the parts of the avatar together into one part. Joining them is not necessary. But, it can simply your life. Gaia joins her’s. Ashasekayi and I make one joined and leave another copy in parts.
Gaia explains the joining process with a neat added step I like. To keep track of the parts Gaia marks the edges of the parts as seams. It is easy and seams are handy things so, let’s do it.

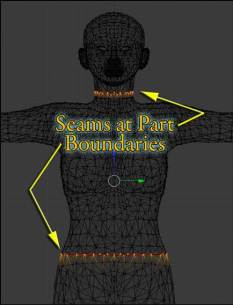
Clear all selections (press A). Select the lower body part (right-click). Enter Edit Mode (press Tab). Press A to clear selections. Press 1 or 3 to orient the view, side or front works best. Press B and drag to select the top row of vertices. (See image) In the left column in Mesh Tools is a Mark Seam button, click it. Or press Ctrl-E and select Mark Seam. Press Tab to exit Edit Mode.
Right-click the torso: to select it. Then press Tab. Select the bottom row of torso vertices and mark them as a seam. Repeat this process at the neck. Then repeat it for the head. You should have some seams like I show in the image. All the vertices making a seam should be in a single ring or loop on the edge of the part.
Remove Doubles
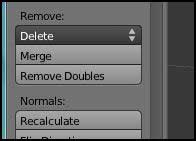
Press Tab to change the 3D View to Edit Mode then press A once or twice to select all the vertices in the current part. Again on the left in Mesh Tools find and click Remove Doubles. This cleans up the model.

Note: A ‘double’ is two or more vertex points occupying the same 3D position. There are legitimate reasons for there being doubles in a mesh. But, often doubles are left over vertices or mistakes we didn’t notice while modeling. For our purposes now there should be no doubles.
Ready But
Now we are prepared to join the parts into a single mesh part. Later we will deal with the actual joining. First we want to weight the individual parts. Then we’ll come back to joining. I’m doing the weighting now because it is a computer speed thing. Weighting can take 5 to 10 minutes depending on the computer.
Attach the Rig – Parenting
To start the weighting process we need the armature or skeleton and the mesh model connected. In future work you will need to connect clothes to the armature the same way. So let’s get that done.

You should have your avatar and the armature on the X-Y zero location. In Domino’s file the armature is in the correct location. Provided your 3D cursor was at 0,0,0 when you imported your avatar mesh, it will be in the correct location too.
To check: in Object Mode select the head. You may need to press ‘N’ to see the Transform information. The N-key opens and closes a panel in the right of the 3D window. At the top of the panel is the label Transform and a location read out. It should read 0,0,0. If not you will need to reposition your avatar. Otherwise, you will have problems with future rigging.
To set the objects to the ZERO position, you can simply type of the numbers in the panel and press TAB or ENTER. The object will move.

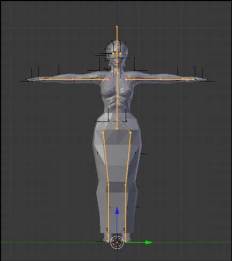
With the head selected press Shift and right-click the armature. Press Ctrl-P or via the menu at the bottom of the window click Object->Parent->Set->Armature Deform. This will set the avatar mesh to move as the armature moves. Repeat this process for the torso and legs.
Check Parenting
You can check to see that the parenting worked. Checking will also help you understand what weighting does when we get to it.
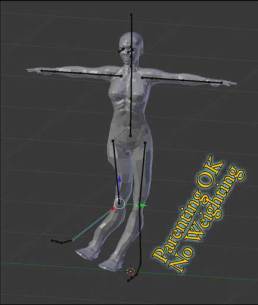
In the bottom menu set your pivot point to Individual Origins. Change from Object Mode to Pose Mode. Right-click a bone: to select one. I chose the lower leg. Press R to enter Rotate and move the mouse. You should see the mesh move with the bone. It is NOT going to be the nice joint movement you see your avatar make in world. In fact both legs are going to move when I move only one leg bone. The whole mesh is going to deform because we have yet to add the vertex weighting, so the system can know how much and which vertices to move with the bone. Without weighting, it moves everything.
Doing the Weighting
As you make clothes you will need to weight them too. So, weighting an avatar is a good example of how to do future clothes weighting. In some tutorials this weighting is also called vertex painting. That can be confusing because there are multiple types of vertex painting that do different things. A more accurate phrasing would be vertex weight painting.
Size
Size is important in the next steps. You need to scale whatever you are working on so that it is as close to the size of the original avatar as possible. The Bone Weight Copy works best when things are close to the same size. So, a t-shirt should fit the base avatar as well as possible for this step. You can rescale to the size you want after the weighting is complete.
Look in the Transform panel (N-Key) and check the scale of the item you are about to weight. All the scale values should be 1.000 (one) and rotations 0.0 for your mesh BEFORE you scale it up or down to fit the base avatar. Press Ctrl-A to apply any rotation or scaling to set the vales to zero and one. Now you can scale your mesh to fit the base avatar. After it is weighted you can manually set the scale values to one to restore it to your original size.
Greetings Nalates, thank you so much for this nice tutorial. This could my final motivation to push myself learn make clothes.
In the page 3 you say that all the viewers uses the same avatar files, but it may be not true. I am not completely sure, so I won’t say names, but I think that there are one or more viewers using the modified avatar filed on STORM-1800:
https://jira.secondlife.com/browse/STORM-1800?
You may be right. There may be some viewers that use the STORM-1800 Avatar. BUT… I expect those to be experimental versions. I think all the main versions TPV Dev’s release will use the same LL avatar. That because of the recent TPV Policy change. Most dev’s interpret it more strictly than I do.
I have yet to test the STORM-1800 avatar to see how it works.
Nal, I think the key to exporting your shape in the SL viewer, at least for Windows, may be to run the viewer as administrator. If I don’t do this, the shape doesn’t export while if I do run as administrator I do get the new_arrchetype.xml file. Right click on the icon that starts the viewer and select Run as Admnistrator.
I think the problem in windows is that the program tires to write to the Program Files (x86) folder which is only allowed in administrator mode.
No… it depends on the version of the viewer you are using. I’ve tried the run as Admin, select avatar, etc. Plus Whirly was able to reproduce the problem.
But, Thx…
Well, I tried it on v 3.3.1 as described, and was able to successfully export the xml. It also works on the current versions of Firestorm and Dolphin, although not in Niran’s. I thought I’d mention it since you specifically mentioned v 3.3.1 of the SL viewer. It could be operating system dependent too.
Thx. I’ll change it.
It looks like the newer viewers (i.e 3.3.3 and those using the newer code base like Niran’s) write the file to C:\Users\User_name\AppData\Roaming\Viewer-Name\user_settings instead of to C:\Program Files (x86)\Viewer-Name\character as before because of write permission prohibition to the latter folder in newer Windows OS’s
And they changed the name, which is why I could not find it.
Thanks.
This is a great tutorial!. Thanks so much for taking the time to do this. I’m just starting to learn Blender and working with mesh. I agree it’s important for people to get under the hood and learn the “poor man’s” approach to doing this. When I get more time, I plan to walk through every step of your tutorial.
I also agree that Avastar is a great product. I’ve uploaded my own shape and am making animations specific to it. Although I haven’t tried mesh clothing yet, making regular mesh objects and uploading them to SL is pretty seamless. It’s cost of $22 USD is no more than most good books.
Just to double check, if you have the avastar add-on you don’t need the Bone Weight Copy script, correct?
Look in your User Preferences -> Add-ons. It will be near the top if it installed. Look for 3D View Copy Bone Weight.
Not sure if I am missing something here. It seems like everything does great up until I do the bone weight copy. From what I can tell, it appears that the process sets the weight for all bones to zero not only on the target mesh, but on the mesh being copied from.
I’m using Blender 2.63a. Is there a known issue, or a different weight copy plug-in I should be using?
Sorry. Still new to all this. 🙁
n/m id10t error. 🙁 I selected the meshes in the reverse order.
🙂 That would do it.
Nalates, you ROCK!!
I am finally anticipating some time to learn how to make mesh clothing and I had no idea where to start. Where else? You never fail us. Thank you!
Be sure you see the Alternative to the Mesh Deformer. It may change everything.
I cannot get the bone weight copy to work I have redone all the steps starting at page one more than 25 times now & everything is fine up to the bone weight copy. They never copy…I have made sure both layers are selected & my mesh is chosen 1st & then the mesh to be copied from which I made sure had weighting. Blender acts like it’s doing something for a minute or two but when it finishes there are no bone weights in my mesh.
Check the weight painting on the source… make sure your source avatar shape has weight painting.
Open a new copy of your base file, add a cylinder around the avatar. Add some edge loops (Ctrl-R then mouse wheel). Parent it to the armature. Do a Bone Weight Copy to see if the weights transfer.
Awesome. Works like a charm and very well written. But I have a problem. When I upload my rigged avatar its head and feet shrink. Any idea why?
Which viewer are you using?
Just imagine I placed my standard rant about including your technical information in with a question about technical issues.
Also, your fastest and likely best answers will come from the SL Forum’s section on content creation.
hello may i ask something? can we put a cloth pattern in blender? and apply it to an avatar body?
Yes…
Thank you , i am looking for tutorials about it , thank you for replying
Thanks for this! Now that Blender has a transfer weights option built in, are you planning on updating this guide for that?
I’m an idiot! I just saw the note on that on the earlier page. Sorry! Thank you! ^_^
Been there done that…
I’ll probably put off updating until I am sure we have a working Fitted Mesh process. The ‘Fitted Avatar Model’ in the viewer is broken. We have JIRA BUG describing problems. The Lab will likely have to make some changes. I have no idea how that may affect what we know now.