Getting Started
If you have setup Blender as I advised, you should have a Blender Folder somewhere with a Blender 2.63, or other version, folder inside it and Blender inside that. But, that is not an absolute. If you did it that way I suggest you create a folder for your add-ons inside the Blender folder on the same level as the Blender 2.6 folder. If not, just make an add-on folder where it will be easy to find. This will make it easy to find your add-ons in a couple of months when you are upgrading Blender. Put the Bone Weight Add-on in there as well as any other add-ons you use.
Fire up Blender. Version 2.5x to 2.63 all should work for this exercise. I recommend 2.63a as it is the current stable release.
Customize Blender
Open a new file from within Blender. Blender can be customized. So, arrange windows the way you like them and it is usually a good idea to delete the standard cube and possibly the light and camera. That is all optional, of course.
Once you have Blender the way you would like it to be each time you open Blender click File->User Preferences… in the bottom of the panel click Save As Default. This saves your changes and you’ll see them each time you open Blender.
Note: These settings can be different in each Blender file. Window arrangement, add-ons, and other changes are saved in each file. So you could have a different setup in each of your projects. The Save to Default copies the current file and settings over Blender’s default.blend. So, you could have a file like Domino’s with the avatar in it as the default file. That could be handy starting point, if you only use Blender for making clothes.

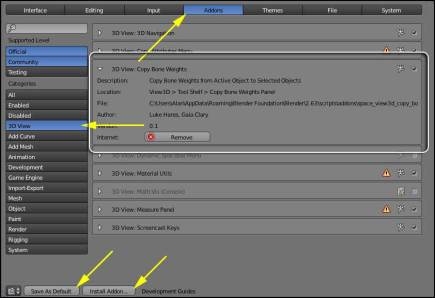
In File->User Preferences… there is a tab for Add-ons. Select it. At the bottom of that panel is a button to Install Add-on… Click it and navigate to wherever you saved the Bone Weight Copy Add-on. Find it and select it. (Currently the file is named: space_view3d_copy_bone_weights_enhanced.py) After the install you need to check the Enable box in the right of Copy Bone Weights Add-on. Then click Save As Default again. This second save will keep the Weights Tool active in each Blender secession.
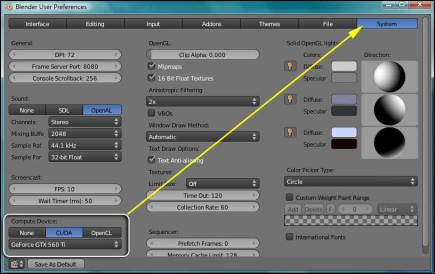
While we are in User Preferences, look for the System tab and click it. Look toward the bottom left for Computer Device. By default this is set to none. Depending on your video card you will have a choice of devices. You may have to experiement to findout which is faster for you, CUDA or OpenCL (Open Computing Language). Select one and click Save as Default. You can close the Preferences panel.

In the User Preferences panel there is a left side tab to select just Export-Import add-ons. I think OBJ import is normally on. But, you may need to enable it. If so, it is named Wavefront.

Remember. If you plan to import shapes often, you will want this setting change in your Blender ‘default’ file too. Use Save as Default only from a file that is setup the way you want and with the contents you want.
Save the changes as user defaults and save a copy of your currently open file.
Update the File made in Easy Method

Now do a File->Open and navigate to the file you made in the Easy Method. Very IMPORTANT, in the left panel of the file open dialog screen and near the bottom UNCHECK the Load UI option. If you forget, Blender switches off all the defaults you just set up. If that happens and your Tool Shelf and other panels rearrange, open a new file and try again.
Once you have your easy Method file open in you have most of what you need for making rigged mesh clothes. You can save this file over your Easy Method file to preserve the changes to the User Preferences defaults. Mine is Nal-working-avatar.blend.
I suggest saving twice with different file names to make a backup copy of this file.
Arranging Things
With the file you want to work in open, we need to do some arranging to make future work easier. If you watched Ashasekayi’s video tutorial: Second Life Rigged Clothing Series: Part 3, you saw how she was arranging her layers.
She kept the armature in Layer 1, moved the avatar model to Layer 2 and Layer 3. In Layer 2 she joined all the parts into a single part. Gaia marked the part edges before joining them in her tutorial. I like those ideas and have sort of adopted them for my work. So, let’s get the file arranged.
Press ‘A’ once or twice: to deselect everything. Select the feet, torso, and face and if you have them, the hair and skirt then press ‘M’ to move them to a different layer. I suggest moving them to Layer 2. While this is not necessary, it will be handy later.

What you have left is a skeleton or armature, whatever you call it. I’ll leave the armature in Layer 1.
If you have the handle thingies (Bone Attachments – which have uses for animating), they are cluttering up things. Right-click to select the armature and press ‘H’ to hide it. Poof.

See the Image #21 to know what the armature is. Hiding leaves all the handle thingies. Press ‘B’ and drag a box to surround all the thingies. Press ‘M’ and move the thingies to another layer. You will have to remember to delete these things when exporting rigged mesh clothes. If you forget, you’ll have a problem.
You should still have Layer 1 active, press Alt-H to reveal the hidden armature.
Importing Shape
Now we’ll import our avatar mesh. You can use any avatar mesh from any of the files or import one you exported from SL. If you use Wiz or Avatar, you’re on your own. If not, I’ll assume you have a Wavefront OBJ file to import.

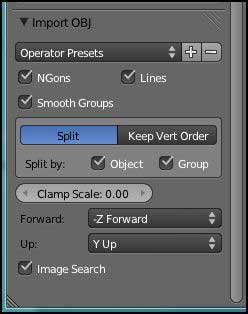
Layer 1 should be active before you start the import. When you import the OBJ file from Phoenix 1185, in the left column at the bottom of the Blender import screen set Forward = Y and Up = Z. This will correctly position the avatar parts. You have to do this for each part imported, usually 3 unless the avatar has been welded into one mesh. The Front and Up values can change for files other than Phoenix’s export files. You can also just bring them all in ignoring Front and Up settings and then rotate them into place after importing. Either way works.
Greetings Nalates, thank you so much for this nice tutorial. This could my final motivation to push myself learn make clothes.
In the page 3 you say that all the viewers uses the same avatar files, but it may be not true. I am not completely sure, so I won’t say names, but I think that there are one or more viewers using the modified avatar filed on STORM-1800:
https://jira.secondlife.com/browse/STORM-1800?
You may be right. There may be some viewers that use the STORM-1800 Avatar. BUT… I expect those to be experimental versions. I think all the main versions TPV Dev’s release will use the same LL avatar. That because of the recent TPV Policy change. Most dev’s interpret it more strictly than I do.
I have yet to test the STORM-1800 avatar to see how it works.
Nal, I think the key to exporting your shape in the SL viewer, at least for Windows, may be to run the viewer as administrator. If I don’t do this, the shape doesn’t export while if I do run as administrator I do get the new_arrchetype.xml file. Right click on the icon that starts the viewer and select Run as Admnistrator.
I think the problem in windows is that the program tires to write to the Program Files (x86) folder which is only allowed in administrator mode.
No… it depends on the version of the viewer you are using. I’ve tried the run as Admin, select avatar, etc. Plus Whirly was able to reproduce the problem.
But, Thx…
Well, I tried it on v 3.3.1 as described, and was able to successfully export the xml. It also works on the current versions of Firestorm and Dolphin, although not in Niran’s. I thought I’d mention it since you specifically mentioned v 3.3.1 of the SL viewer. It could be operating system dependent too.
Thx. I’ll change it.
It looks like the newer viewers (i.e 3.3.3 and those using the newer code base like Niran’s) write the file to C:\Users\User_name\AppData\Roaming\Viewer-Name\user_settings instead of to C:\Program Files (x86)\Viewer-Name\character as before because of write permission prohibition to the latter folder in newer Windows OS’s
And they changed the name, which is why I could not find it.
Thanks.
This is a great tutorial!. Thanks so much for taking the time to do this. I’m just starting to learn Blender and working with mesh. I agree it’s important for people to get under the hood and learn the “poor man’s” approach to doing this. When I get more time, I plan to walk through every step of your tutorial.
I also agree that Avastar is a great product. I’ve uploaded my own shape and am making animations specific to it. Although I haven’t tried mesh clothing yet, making regular mesh objects and uploading them to SL is pretty seamless. It’s cost of $22 USD is no more than most good books.
Just to double check, if you have the avastar add-on you don’t need the Bone Weight Copy script, correct?
Look in your User Preferences -> Add-ons. It will be near the top if it installed. Look for 3D View Copy Bone Weight.
Not sure if I am missing something here. It seems like everything does great up until I do the bone weight copy. From what I can tell, it appears that the process sets the weight for all bones to zero not only on the target mesh, but on the mesh being copied from.
I’m using Blender 2.63a. Is there a known issue, or a different weight copy plug-in I should be using?
Sorry. Still new to all this. 🙁
n/m id10t error. 🙁 I selected the meshes in the reverse order.
🙂 That would do it.
Nalates, you ROCK!!
I am finally anticipating some time to learn how to make mesh clothing and I had no idea where to start. Where else? You never fail us. Thank you!
Be sure you see the Alternative to the Mesh Deformer. It may change everything.
I cannot get the bone weight copy to work I have redone all the steps starting at page one more than 25 times now & everything is fine up to the bone weight copy. They never copy…I have made sure both layers are selected & my mesh is chosen 1st & then the mesh to be copied from which I made sure had weighting. Blender acts like it’s doing something for a minute or two but when it finishes there are no bone weights in my mesh.
Check the weight painting on the source… make sure your source avatar shape has weight painting.
Open a new copy of your base file, add a cylinder around the avatar. Add some edge loops (Ctrl-R then mouse wheel). Parent it to the armature. Do a Bone Weight Copy to see if the weights transfer.
Awesome. Works like a charm and very well written. But I have a problem. When I upload my rigged avatar its head and feet shrink. Any idea why?
Which viewer are you using?
Just imagine I placed my standard rant about including your technical information in with a question about technical issues.
Also, your fastest and likely best answers will come from the SL Forum’s section on content creation.
hello may i ask something? can we put a cloth pattern in blender? and apply it to an avatar body?
Yes…
Thank you , i am looking for tutorials about it , thank you for replying
Thanks for this! Now that Blender has a transfer weights option built in, are you planning on updating this guide for that?
I’m an idiot! I just saw the note on that on the earlier page. Sorry! Thank you! ^_^
Been there done that…
I’ll probably put off updating until I am sure we have a working Fitted Mesh process. The ‘Fitted Avatar Model’ in the viewer is broken. We have JIRA BUG describing problems. The Lab will likely have to make some changes. I have no idea how that may affect what we know now.