Deconfuser
All the files listed above use the exact same avatar mesh. When exporting from SL using Phoenix Viewer’s Meshes and Morphs feature, more on this later, there is the choice to export the Base Avatar, which I think sucks the mesh out of the Ruth/Roth files built into the viewers. All viewers use the same avatar files. It appears all the meshes and the Ruth/Roth meshes in the above listed files are the same mesh.
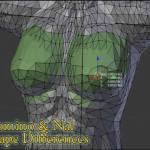
In Phoenix’s Meshes and Morphs there is the choice to export the Current Mesh, which will export the current shape you are wearing. If you have created a new shape and avoided making any changes to it, so it is the default shape, you will export a mesh that is very nearly the same mesh as the Base Avatar. This default shape is the RECOMMENDED shape for those planning to have mesh items handled by the coming Mesh Deformer. That is not the exact shape I find in files listed above.
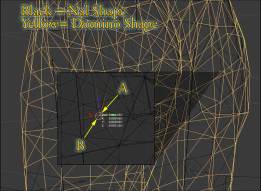
If one creates a new shape as Karl suggests and exports that shape, there are slight differences between the base and current exports. They are very small. I also asked Karl about these small differences. He believes they won’t matter.
So… while there is a technical distinction between the ‘default avatar-Ruth/Roth-base’ and the ‘default shape,’ it is so small it should make no difference. So, whether you use a Ruth/Roth shape found in files above or the Default Shape the thinking is it should make no difference.
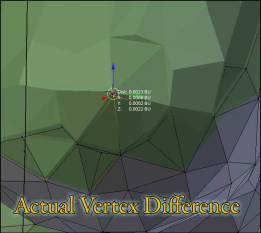
The avatar mesh difference is shown in the image. Domino’s, Workbench, and the Base Avatar seem to be exact duplicates. All the files seem to use the same mesh. The Current Avatar export using the default shape is slightly different. The actual difference in the distance between identical vertices is 0.0044 Blender Units (BU). The difference is in the avatar’s butt. The files have a larger butt and the default shape a smaller butt.
There are some differences in the hands, feet, and face. Most of the rest of the mesh is a perfect match.
These are small differences. I can’t see that it makes that much difference to the final product after the Deformer smoothes the math and calculates the deformation. The real problems come from the basic design of the Second Life avatar and that is unlikely to change any time in the next couple of years… or longer.
Are we deconfused on which avatar to use? As far as I know, all the files listed have a mesh that will work well with the Deformer. The differences between the default this that or whatever are too small to worry about.
The File to Use
The reason I rewrote this tutorial is there currently is no best file for Blender 2.63a. If you just want a file to use, grab Gaia’s avatar-workbench-263.blend. For this tutorial I’m going to use a new, empty Blender file. My hope is this tutorial will remain valid longer and be more useful as additional Blender versions come out.
To make an easy quick file preparation tutorial and to provide a longer more educational experience I’ll start with Domino’s file. I’ll prove the easy steps then follow with a more complex process. The result will be similar to the 263 file, but not as complete. In other tutorials I’ll be adding the things that are in it.
Fixing Domino’s File for Second Life Use
Unfortunately most available files are not useable for creating rigged mesh for import to SL in their current download state. We need to make some fixes. I picked Domino’s because I can demonstrate more things.
Gaia has a tutorial (Rigg your Avatar) on setting up a Blender file for rigging. She made this when Blender 2.49b was the prime choice of Second Life users. But, it works pretty well for those using Blender 2.5 and 2.6 versions. However, it assumes you will have exported an avatar mesh that you want to set up. This is really good for those trying to understand how to rig meshes. For those just trying to get a file set up it adds extra complication. I’ll show you how to fix the file as easily as possible. Then I’ll go on to show you how to do the custom shape export and setup, because that will teach you a bit about rigging.

Easy Method
The hold up with Domino’s file is a couple of bones are missing, there are bone attachments that are a problem for those using Blender 2.63, and it lacks the Brushes needed for weight painting. We need to fix or add those items in. Then we are good to go with our own rigging for import to Second Life.
For Blender 2.49b Ashasekayi has a video tutorial: Second Life Rigged Clothing Series: Part 3. This video shows how to create the missing bones in the model. It also shows removing all the extraneous vertex groups. That removal may not be necessary. Gaia skips deleting the extra groups. I have files with and without the extra groups. Whichever is better is something I have yet to decide. I’ll show you how to add and delete groups in Blender 2.5 and 2.6, so you can do whatever feels right for you.
Here is the list of Ashasekayi’s tutorial videos: Second Life Rigged Clothing Tutorial Series. She did these very well. While they are made using 2.49b, you can learn from them.
Create Blender File
Open Blender 2.63a. This will create a copy of the default Blinder file. Save it with a meaningful name. This will become the base file for future use in creating mesh clothes.
One can open Domino’s file in Blender 2.5 or 2.6, but doing so makes a mess of things. A large part of the mesh is hidden. I didn’t find that out until way too late. So, this time we are going another route. Rather than opening Domino’s file we will APPEND it into the new Blender file.
Appending Other Files
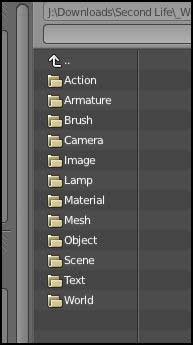
We are going to append Domino’s avatar and its associated stuff into our new file. The steps are:
- Open a new empty Blender file using a 2.5x or 2.6x version. (done above)
- Set the layer you want active. The active layer is where the Appended Items will land.
- Now open the Domino’s Blender file using File -> Append.
- You should see Image #11
- There is no way to append an entire file. If you were going to do that you would just open the file, but that brings in too many things we do not want.
- The part of the file we want is in OBJECT. If you try to use MESH, it appears not to work. It works but it’s not what we want and that is beyond this tutorial.
- Select OBJECT. You will see a long list of names.
- Select the items you want to append. You can use Shift-Left-Click to select more than one.
- It is important you select all the Parented Items in one append action. Otherwise, you will get multiple armatures. That is not all bad. I decided to use separate armatures for my in-parts-avatar and my one-part-avatar. Whatever, it can be changed later.
- What you select is influenced by what you want to do. The very least you are going to need is the head, upperbody, lowerbody, and avatar. That is enough to make mesh clothes.
- You will see a load of things like L Upper Leg, R Forearm, etc. These are the Bone Attachments that mess up the Collada export from Blender 2.63a. DO NOT append them. That should be corrected in Blender 2.64. But, they do still get in the way.
- Once you have made your selection, Append your items to the file.
Fixing the Missing Bones
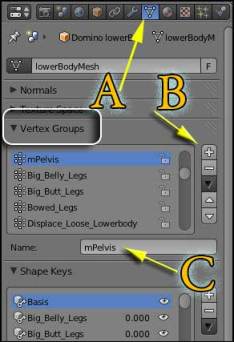
In the far right properties panel select Object Data (Image #13), the upside down triangle icon. (see the image arrow A). This will open the panel so you can see the Vertex Groups. To the right of the Vertex Group name list are the controls you need (B). They are:
- Plus – Creates new groups.
- Minus – Deletes groups.
- Black Triangle – Open options menu.
- Up & Down Arrow – Arrange the list.
Click the PLUS to create a new group. Just below the group list is an input field (C) where you can type in the new group’s name. Add: mFootLeft and mFootRight. Spelling is important. This file is now ready to use for rigging and importing to Second Life.
To keep things orderly you may want to move the two new groups so they are positioned in the list with the other ‘m’ bones items. But, that is not necessary. You can also use the Options to arrange the list too.
You may also want to delete all the groups that are not for bones, all the bone groups start with an ‘m’. As best I can tell this removal is not necessary.
Save the file as a basic starter file for your rigged mesh work. It is pretty much ready for making clothes for export to Second Life.

Bone Attachments
If you goof and get some Bone Attachments in the file, no big deal. But, you probably need to know what they look like. See Image #14. These need to be removed before you attempt to export a mesh for Second Life.
Removing Bone Attachments
In case you got some or want to use an older file you have, here is how to remove them:
- Press A to deselect everything while in Object Mode.
- Right-click and shift-right-click to select the head, upper body, lower body, and the armature. Press H to hide these parts.
- Press B and click-drag a window to select all the Bone Attachments.
- Press X or Delete to delete the items.
- Press Alt-H to make the hidden parts visible.
- Save a copy of this file.
This file is pretty much ready for use as a base file for making clothes.
Greetings Nalates, thank you so much for this nice tutorial. This could my final motivation to push myself learn make clothes.
In the page 3 you say that all the viewers uses the same avatar files, but it may be not true. I am not completely sure, so I won’t say names, but I think that there are one or more viewers using the modified avatar filed on STORM-1800:
https://jira.secondlife.com/browse/STORM-1800?
You may be right. There may be some viewers that use the STORM-1800 Avatar. BUT… I expect those to be experimental versions. I think all the main versions TPV Dev’s release will use the same LL avatar. That because of the recent TPV Policy change. Most dev’s interpret it more strictly than I do.
I have yet to test the STORM-1800 avatar to see how it works.
Nal, I think the key to exporting your shape in the SL viewer, at least for Windows, may be to run the viewer as administrator. If I don’t do this, the shape doesn’t export while if I do run as administrator I do get the new_arrchetype.xml file. Right click on the icon that starts the viewer and select Run as Admnistrator.
I think the problem in windows is that the program tires to write to the Program Files (x86) folder which is only allowed in administrator mode.
No… it depends on the version of the viewer you are using. I’ve tried the run as Admin, select avatar, etc. Plus Whirly was able to reproduce the problem.
But, Thx…
Well, I tried it on v 3.3.1 as described, and was able to successfully export the xml. It also works on the current versions of Firestorm and Dolphin, although not in Niran’s. I thought I’d mention it since you specifically mentioned v 3.3.1 of the SL viewer. It could be operating system dependent too.
Thx. I’ll change it.
It looks like the newer viewers (i.e 3.3.3 and those using the newer code base like Niran’s) write the file to C:\Users\User_name\AppData\Roaming\Viewer-Name\user_settings instead of to C:\Program Files (x86)\Viewer-Name\character as before because of write permission prohibition to the latter folder in newer Windows OS’s
And they changed the name, which is why I could not find it.
Thanks.
This is a great tutorial!. Thanks so much for taking the time to do this. I’m just starting to learn Blender and working with mesh. I agree it’s important for people to get under the hood and learn the “poor man’s” approach to doing this. When I get more time, I plan to walk through every step of your tutorial.
I also agree that Avastar is a great product. I’ve uploaded my own shape and am making animations specific to it. Although I haven’t tried mesh clothing yet, making regular mesh objects and uploading them to SL is pretty seamless. It’s cost of $22 USD is no more than most good books.
Just to double check, if you have the avastar add-on you don’t need the Bone Weight Copy script, correct?
Look in your User Preferences -> Add-ons. It will be near the top if it installed. Look for 3D View Copy Bone Weight.
Not sure if I am missing something here. It seems like everything does great up until I do the bone weight copy. From what I can tell, it appears that the process sets the weight for all bones to zero not only on the target mesh, but on the mesh being copied from.
I’m using Blender 2.63a. Is there a known issue, or a different weight copy plug-in I should be using?
Sorry. Still new to all this. 🙁
n/m id10t error. 🙁 I selected the meshes in the reverse order.
🙂 That would do it.
Nalates, you ROCK!!
I am finally anticipating some time to learn how to make mesh clothing and I had no idea where to start. Where else? You never fail us. Thank you!
Be sure you see the Alternative to the Mesh Deformer. It may change everything.
I cannot get the bone weight copy to work I have redone all the steps starting at page one more than 25 times now & everything is fine up to the bone weight copy. They never copy…I have made sure both layers are selected & my mesh is chosen 1st & then the mesh to be copied from which I made sure had weighting. Blender acts like it’s doing something for a minute or two but when it finishes there are no bone weights in my mesh.
Check the weight painting on the source… make sure your source avatar shape has weight painting.
Open a new copy of your base file, add a cylinder around the avatar. Add some edge loops (Ctrl-R then mouse wheel). Parent it to the armature. Do a Bone Weight Copy to see if the weights transfer.
Awesome. Works like a charm and very well written. But I have a problem. When I upload my rigged avatar its head and feet shrink. Any idea why?
Which viewer are you using?
Just imagine I placed my standard rant about including your technical information in with a question about technical issues.
Also, your fastest and likely best answers will come from the SL Forum’s section on content creation.
hello may i ask something? can we put a cloth pattern in blender? and apply it to an avatar body?
Yes…
Thank you , i am looking for tutorials about it , thank you for replying
Thanks for this! Now that Blender has a transfer weights option built in, are you planning on updating this guide for that?
I’m an idiot! I just saw the note on that on the earlier page. Sorry! Thank you! ^_^
Been there done that…
I’ll probably put off updating until I am sure we have a working Fitted Mesh process. The ‘Fitted Avatar Model’ in the viewer is broken. We have JIRA BUG describing problems. The Lab will likely have to make some changes. I have no idea how that may affect what we know now.