UPDATE: 3/2012 – This was neat, but the site with the download is down. It may come back or there may be another download site. I do not know of another site and we can only hope the site comes back.
Photoshop CS4 and 5 Extended allow one to skip using HAX and work directly on the 3D avatar model. Blender will also allow import of the SL avatar model. One can use its texturing and painting tools to work directly on the model.
So, unfortunately, as with many things, HAX and this article are out of date.
UPDATE: claireharford has started hosting the files needed for Multi-Chan Hax. LINK
This is neat. If you are a clothes maker in Second Life, you need to know about this way of making clothes. Clair Hartford posted a tutorial on the SL blogrum today. I think the thing is awesome. I’m excited. If you want to make seamless clothes, this is something you really want to know. This process has been around since 2009 and I’m just now finding out about it. Darn.
[youtube N1AyEuB0b6M]
First let’s get the caveats out of the way. The thing does not work on Mac or Linux. Sorry. 🙁
If you are running 64-bit Photoshop, or whatever, the 32-bit plugin will NOT work. There may be a work-around for that. I don’t know it.
Also, you need Photoshop, Paintshop Pro, or GIMP. Any image editor that can handle 8bf filter formats can use the tool. It works in my CS3.
Downloading
Tech Slop has the Multi Chan Hax plugin you need. It is free. There is a lot of technical information on how the filter works on the download page. It seems this tool was designed to solve a problem a 3DSMax user had.
There are other files that you need to go with the plug-in. The files are additional types of UVMaps. You can get them at Tech Slop too. Multi CH Repository
There are ten files there. Each with a short description. I suggest you get them all. These are templates files like Chip Midnight’s or Robin Wood’s.
If you don’t already have them, you need Chip’s or Robin’s templates too. You can find Chip’s templates linked to from the SL Clothing Tutorials. There is lots of handy information on this page. Robin’s templates are linked to from the page too. Hers are referred to as UV templates. Which templates you use is only a matter of personal preference.
You will also need the Solidify filter/plugin from Flaming Pair. Look for the plugins labeled Free Plugins.
That gets you the needed parts.
Installing
The Multi-Chan Hax stuff is packed into RAR files. If you do not have a program to open RAR files consider the free Zip Genius. It handles a wide range of compressed files.
Unzip the files and plugins. I usually keep everything together for such a tool. The MCH files need to be some place you can easily navigate to from inside Photoshop/Gimp/whatever.
The files ending in 8bf need to be copied into Photoshop’s, or whichever editor’s, plugin folder before you open the image editor. For Photoshop that is:
C:\Program Files\Adobe\Adobe

Photoshop CS3\Plug-Ins\Filters
You can probably guess the CS3 part will need to change depending on your version of PS.
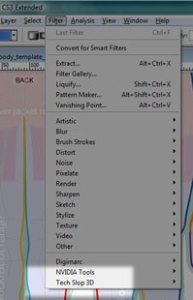
That is pretty much the install. To test it, open any file, preferably a Chip or Robin template, look in the menu item Filter for the entry Tech Slop 3D. See the image.
That handles the install.
Using the Tool/Filter
If you think this is an intuitive tool and you’ll pick it up on the fly… think again. Watch the tutorial and step your way through it. After that you can try winging it.
[youtube GdYdXm3BFmU]
Tutorial by mistressofdesign
The process is not complex. It is way faster than what I have been doing to match up seams. This is loads nicer.
Gotcha’s

There is a place that no matter how many times I watch the video, I can’t get it to work right. It has to do with the transparency. Clair uses Channels to control transparency. I typically use vector masks, which are sort of the same thing but in the Layers panel rather than the Channels panel.
When I make the transparency control, I do it just after expanding the selection by 4 pixels. Yeah, you gotta look at the video, it’s at about 6:35. Once the Expand completes I click what is often called the mask button in the Layers panel. I think it is a bit faster and targets only the layer you want. (See the Image.)
If you have an upper edge on your stocking, you will need to trim the pixel expansion off the top, whichever way you create the transparency mask. The use of the Solidify filter is a handy way to fill the bleed areas.
Results
Awesome. My example sucks. I used a horrible, over detailed, yucky color, fuzzy texture. But there are NO SEAMS! Awesome. Now to find some nice lace textures and try for real.
A fabulous tutorial! So easy to understand and incredibly helpful! Seams can be such a pain but this makes things much easier. I hope you do more tutorials in the future ♥
I plan to do more on MCH. However, not everything is as nice as the stockings mapping. I’m still sorting my way through some of the others.
Do you have a alternative download for Multi Chan Hax- Filter and Multi Chan Hax- Files because the website is down.
Thanks for your help !
No… sorry.
Photoshop CS4 to CS6 CC Extended allow one to work directly on the avatar model. So, I no longer need Hax. I’ll update the article.
what do you mean about that??
Could you be more specific?